|
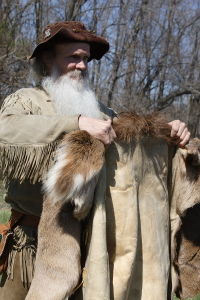
A hide that has been brain tanned with the grain and the hair removed, is called buckskin.For those of you who make Buckskin or enjoy home tanning, brain tanning is the most popular method used, as it can be completed in a matter of days.Hides that has been brain tanned with the grain and the hair removed, is called buckskins. This type of leather is very strong, soft, durable, warm, and best of all, washable. It easily breaks the wind, flows with your body movements, and allows the skin to breathe.This soft leather can be made from any of the hoofed animals, including deer, sheep, buffalo, and other large game. Buckskin refers to the method by which the hide has been tanned, not because the hide is from a deer.
Here are some quick and fast steps to brain tanning hides at home.(Or making buckskin) 1. Remove all of the meat and fat from the hide. This is what is called fleshing the hide. Soak the hide in water overnight, making sure the hide is completely soaked. It is simpler to dehair a fresh hide, rather than one that has dried into rawhide. 2. The process of dehairing begins by removing the hide from the water and placing it over a beam. Scrape all of the brown layer, or epidermis, of skin off the hide. If you are using a dried hide to make buckskin, that still has the hair intact, soak it overnight and once again, flesh the hide. Soak it in water once again overnight and begin the process of dehairing the following day. 3. Keep in mind that most times, a hide must be brain tanned more than once in order to achieve the desired results of buckskin. This step is called pre-braining. Right after the hair is removed from the hide, it is very pliable, so directly after dehairing, place the hide in the brain solution. If for some reason you are unable to get to the hide quickly after dehairing, soak it overnight in cold water and then stretch the hide by hand for a few minutes, using a metal strapping band. This will open the pores and it will soak in the brain solution much more readily. The length of time you soak the hide in the brain solution is truly a personal preference. It can be soaked for as little as twenty minutes, or as long as overnight. 4. Once the pre-braining process is complete, hang the buckskin out to dry, without wringing it out. Try to hang it straight up and down for the best results. Avoid folding the hide on itself by propping it up with sticks, or whatever is handy. 5. Next, take the dried hide and soak it (yes again!) in very cold water overnight. The temperature of the water is important, as it makes the hide pliable. Lace the hide on a frame and sew up any holes in the hide. Stake out the hide in order to whiten it out. As you stake it out, it may become a bit softer. Again, personal preference rules here. If you like a softer buckskin, continue to stake it out until you have the desired suppleness in the hide. 6. The pre-smoking step is next. Once the hide is whitened and dried, you'll smoke it. Construct a simple smoke house by using four sheets of 4x8 plywood plus a roof to make a box. Be careful not to bake the hides. Hang them horizontally about three feet above the smoke pot, over a warm smoke, for approximately three hours. Punk cedar wood is recommended by many who tan hides at home themselves. 7. After the hide is smoked, it is returned to the brain solution for roughly thirty minutes to one hour. Remove it and rub it over the band to check for hard spots in the hide. If you find some, soak the hide a little longer. Once the hard spots (if any) are removed, the hide goes back into the brain solution once again overnight. 8. The next morning, remove the hide from the brain solution and either put it through a clothes wringer, or wring it out by hand. Now it's time to work the hide using a beam, a rope or a cable, in order to soften the hide. Since the hide has been smoked, it won't take much work to soften it up. Brain solution for brain tanning is available from certain suppliers, or you can make your own. Some would say the animal provides just what is needed to tan its own hide. Or, you can use a cow brain and two gallons of water. Heat the solution until it is warm, but DO NOT allow it to get too hot. It should have the consistency of a weak tomato soup. One cow brain will tan several hides. You can always add water as it is needed. At times, another cow brain might need to be added. Just keep an eye on the solution. If possible, use rain water instead of city water that probably contains chlorine, to prevent adverse effects on the hide. Just a guideline: two cow brains (solution) can brain tan as many as 22 large hides. Bovine leather is the most popular type sold on the market today and is ideal for tote bags, purses, clothing, kitchen accessories, hair ties and beadwork. However, if you are looking for luxury leather, ostrich leather is one you'll want to consider. It is definitely more expensive than bovine leather, but the look of ostrich leather is unmistakable. In the center of the hide, there are raised points, which are the follicles where the feathers were once located. About one-third of the hide has these bumps; the rest of it is quite smooth, which makes it very desirable for purses, business card holders, wallets, money clips, checkbook holders, eye glass cases, coin purses, or cell phone cases. Of course, there are specialty processors who are more than happy to tan your hide for you, but the experience of brain tanning at home is extremely rewarding when the end product is finally in your hands. Patience, perseverance and hard work go a long way when you are tanning your hides at home.
you can have pay-per-play on your site and get paid.
|